Subtitle: “Ubiquiti Auto-Optimise Breaks stuff again” (it is also responsible for this).
The Scenario
I have been having persistent, annoying and sustained issues with older Sonos devices dropping off of my WiFi network after a while. This is on a network driven entirely with Ubiquiti UniFI products (switches and access points connected to a UDM-Pro).
The older Sonos products would disappear regularly from view from the Sonos Apps.
Power cycle them and they return, but then any time from a few minutes to a few hours later… they’re gone again. Power cycle yet again. Rinse and Repeat. Grrr.
The Problem
The Ubiquiti ‘auto-optimize’ function strikes again – and breaks stuff. Hmmm.
The ‘optimize’ fuction modifies the minimum data rate for 2.4Ghz ‘beacon’ frames to a rate above the 802.11b default. Doing this breaks WiFi connectivity for devices that can only use 802.11b. The older Sonos models use 802.11b. So … this breaks them.
The Fix
(1) Turn off ‘auto-optimize’ (under Advanced settings in the Network settings page).
(2) Turn off the checkbox “2G Data Rate Control” on the Wireless Network page for your WiFi SSID concerned (see images below) to restore working 802.11b WiFi connectivity
The Details (if you need or want them)
I have Sonos One devices and (older) Sonos Play:5 devices. Its the Play:5’s that kept going away.
Importantly the older Sonos units are 2.4Ghz 802.11b only units devices… they can’t talk on 5Ghz (but the UniFi AP’s can bridge them to control devices running on newer devices and newer bands).
After a lot of head scratching, I realised that ‘something’ had changed a critical setting on my UDM-Pro.
The setting that was changed was the one (in the Wireless Network page) called “2G data rate control”.
This had been turned on (by the ‘auto optimizer’) and set to 5.5Mb/s minimum:
This is a minimum beacon rate that (as it says on the page) causes “Limited range and limited connectivity for 802.11b devices”
The older Sonos devices are 802.11b 2.4Ghz only devices! Hence this setting is guaranteed to break Sonos Network access – and to keep breaking it. Argh.
So: The fix is to set that minimum data rate back down to 1Mb/s, at which point the on-screen text changes to “Full Device Compatibility and Range”:
Fixed! Yay!
It is simpler (and more direct) to just disable the rate changing function entirely (by un-checking the box ‘Enable Minimum data rate control’.
However, I wanted to point out the changes in that explanatory text with the screen images above. These underscore that the optimiser (which is on by default) really does make changes that break older WiFi device access (and without warning the user that this is what will happen).
Note that on the UDM (vs the UDM-Pro), there are different checkboxes to restore 802.11b connectivity. On that platform, you (again) turn off the optimiser and then under your WiFi network configuration page you’ll find a switch hiding in the “Advanced” section “Enable Legacy Support”. This switch is explained with the text ‘Enable legacy device support (i.e. 11b)’. Duh. So turn that on (i.e. do enable the legacy device support).
I’m sure this is breaking connectivity for other devices too – there are going to be lots of little gadgets in people’s networks that are older or simpler and that only support 802.11b. If you want those to work… you’ll want to enable that legacy support.
Update: We have some wall mounted underfloor heating controllers (with WiFi) in the house… that were unreliable and just couldn’t hold a WiFi connection. You know where this is going … now they work just fine.
I’m writing this down in the hope that someone else trying to solve this issue via some random ‘Googling’ may find this article and that it may save them some time… compared to how long it took me to solve this!
I run a moderately sized UniFi based network consisting of a UDM-Pro, 10 UniFi switches on a fibre ring, and 19 UniFI Wireless LAN access points.
I turned on automatic software updates on the UDM-Pro a while ago, and I am presuming that the issue that has occurred here is as a result of the latest software that got auto-installed (UniFi UDM Pro Version 1.10.4 and ‘Network’ version 6.5.53).
It took me a few days to figure out that the UniFi network was the cause of broken printer operation and also the cause of our on-site Sonos audio devices all ceasing to work.
The way the ‘breakage’ occurs is subtle – some, but not all, peer to peer IP traffic over the wireless LAN was being silently dropped. Broken things included Multicast based protocols (such as AirPrint) and also initial connection establishment (with the ARP protocol’s broadcast frames apparently being filtered as well)
This impacted some network nodes but not to all of them.
The way this first manifested was that our printer stopped working. It didn’t work wireless-to-wireless, and it didn’t work when I tried cabling it into a switch and accessing it via wireless on my laptop.
The failure to work even on a wired connection convinced me the printer was just… b0rked, and that it was time to replace it.
In a similar timeframe, the Sonos audio devices in our house also stopped working. I didn’t initially register the timing coincidence with the printer fault because, frankly, Sonos network communication sometimes get flakey ‘all by itself’…and I had shelved that issue to figure out ‘later’.
In the meantime, we actually went and bought a new printer! When I fired that up, it failed to work as well (!). Ah hah… ‘lightbulb moment’. It wasn’t the printer. It was something far more fundamental about the network. It had to be.
I started digging deeper, with that new data point (that it wasn’t actually the printer at fault). Eventually, via various network diagnostic steps, I figured out that a strange network failure mode was the real issue.
Since it seemed to be impacting broadcast and multicast frames, I started looking for, and adjusting settings related to that functionality in the UDM-Pro.
Eventually I landed on the fix:
Turn OFF the ‘AUTO OPTIMIZE NETWORK’ setting under the Settings->Site menu. This is necessary in order to unlock the ability to change the next setting
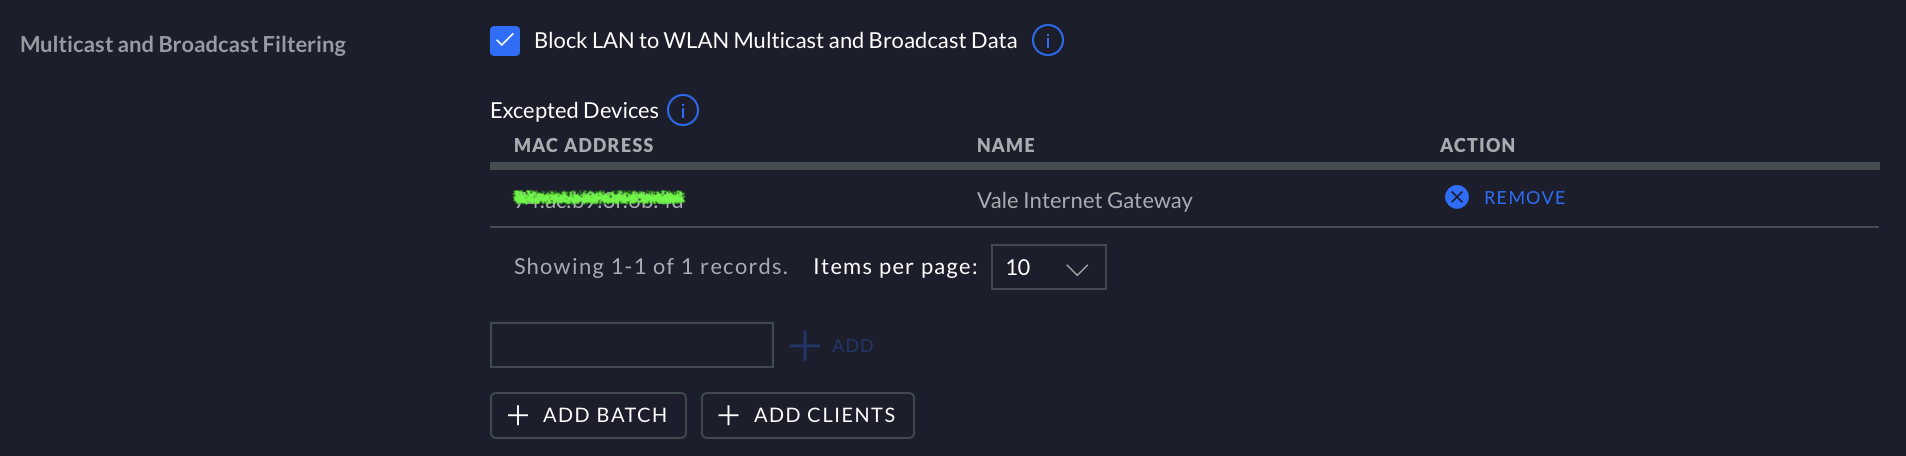
Turn OFF the checkbox called “Block LAN to WLAN Multicast and Broadcast Traffic” on the Settings->Wireless Networks-> [ Your network name here ] -> EDIT WIRELESS NETWORK page
Turn this off to fix the fault
Ii is that latter setting that is doing the damage. When on, it is literally blocking things as fundamental as ARP broadcast packets so that IP connections can’t even be established reliably between hosts on the local network. Hosts can all talk to ‘the wider Internet’ just fine, but they can’t talk to each other.
I didn’t take any manual action to break the network – all I did was leave automatic OS updates turned on and a few days ago – these mysterious faults appeared.
See the screen shots below to help you find where those settings located on the UniFi Web console interface.
As soon as I took the steps above, the UDP-Pro re-provisioned all my UniFI WiFi access points and everything started working again – printer started working perfectly, Sonos started working fine. I proved this is the issue by turning the setting back on and – bingo – instant network faults. Off again…and it all works again.
I hope this helps someone else!
I’ve reported it to Ubiquiti because I think they need to urgently make a further update to fix this pretty fundamental bug, and hopefully they’ll indeed fix it.
In the meantime, I hope this post helps someone else avoid the head scratching (and/or throwing out perfectly good printers and/or Sonos units!).
This is where the ‘AUTO-OPTIMISE’ switch is (turn off to unlock the following setting change)Turn off the checkbox at the bottom of this screen to fix the WLAN network fault
Update-1:
12 Dec 2021: The ‘Network’ version has been incremented to 6.5.54 as at 12 December 2021.
Some good has been done in this incremental release: It has been kindly pointed out to me that a workaround is in there now for small sites, so at least small sites (less than 10 APs) won’t suffer this issue any longer.
The following comment has been added to the release notes for 6.5.54 (from here):
Enable multicast block if Auto-optimize is enabled, and there are more than 10 APs assigned to SSID.
My site does have more than 10 APs assigned to the SSID concerned. So, for me, 6.5.54 still shows the issue (which explains why, in my testing, the fault wasn’t fixed in 6.5.54).
This is a good thing – sites with less than 10 APs will now no longer see this bug.
However: The bug still exists and this workaround is just hiding it until it leaps out and bites sites in the tail when they expand to 10 or more APs (on the same SSID). Argh.
This feature (when enabled) is breaking fundamental aspects of TCP/IP network operation on a routine basis.
There are two issues here.
The first is that it is quite possible for two hosts to be associated to two different APs while being in the same physical location. Picture a printer on a desk and a user of that printer who has walked in from the AP next door (and is still associated with the AP next door).
Or picture a location that happens to just be at the intersection of two roughly equidistant APs (which is going to happen all the time on a network with more than 10 APs)
When this happens, the outcome for users in terms of Multicast/Broadcast activity is going to become intermittent – sometimes it’ll block packets, and sometimes (if host hosts do happen to both be on the same AP) it might work…for a while. And then stop again mysteriously later.
This intermittency was evident in my initial testing (and now I appreciate why).
As people make their networks larger (and of course for anyone who already was running a large network and who has auto-updated), they will see this mysterious problem happen both without warning and without explanation.
I actually think that’s worse… because now its a fault that unexpectedly occurs when the network expands beyond a certain point. Pity the IT guy who has to figure that one out, with the sole clue being that one line in the Network 6.5.54 release notes.
The signature example of the seriousness of this problem is something completely fundamental to working TCP/IP networks:
This feature blocks ARP packets
As a result, the establishment of working unicast connections between hosts in the local network (e.g. as fundamental as connecting to a printer and using it) will not work reliably (or in many cases, will not work at all)… which is where we came in.
It also means, for instance, that if you try to ‘ping’ another host on your local IP range, that ping might work, or it might not, depending on where the other host is, across your network (or on whether it has roamed to another AP that is reachable in the same physical location).
Debugging that sort of thing could drive people a bit crazy.
Without consideration of this, the functionality of the feature in general is pretty broken.
I get the point, and in implementing this, Ubiquiti means well, but it has not been fully thought out and it is going to be the cause of nasty (and worse, subtle) network faults on a continuing basis until more effort is put in to how this feature works (and to allowing the operator to select Broadcast and MultiCast packet types to continue to forward!).
I’ve noticed that when turned on, this feature allows for the addition of hosts by MAC address that are still able to be visible network wide:
You can add HOSTS to exclude from blocking but you can’t add PROTOCOLS (such as ARP) to exclude!
That is a tacit admission of how this feature breaks stuff.
Adding hosts to the exclude-from-blocking list by MAC address is well meaning, but network operators will be perpetually chasing their own tails as people add printers or audio devices (or replace busted ones). Maintaining a MAC address block list is just a ‘make work’ activity that no network administrator (or their users) needs. Not ever.
Ubiquiti has implemented extensive device ‘fingerprinting’ of devices over time. This meansthey can figure out what things are. If this feature is going to exist (and be silently turned on without warning!!) at all, then it has to be configurable in terms of device types and/or broadcast/multicast protocols that can be whitelisted, not hosts.
Again the issue here is that there are protocols (like ARP – argh) that you just can’t block between APs at all, without breaking fundamental aspects of how TCP/IP networks work.
This isn’t good, and until it is further improved, the underlying problem remains. The change in .54 does help a bit, for most people… but for the people it doesn’t help, it has made the real problem (that the feature itself is un-tenable as it stands) both harder to find (and hence harder to fix).
The Ubiquiti UDM-Pro is a wonderful beast – everything you’d rationally want in a great, secure, high performance, feature-rich network router with a truly corporate grade feature set. In combination with Ubiquiti UniFI Switches and UniFI Access Points, the result is a capability to set up and run a network with something remarkably close to ‘the greatest of ease’.
The servers and services it makes available used to require days of head-scratching and a Unix command line. Instead, with this equipment, it takes a few hours and an iPhone App (for initial super-easy UDM-Pro configuration) and includes an excellent web interface (with secure remote access also available) for ongoing management.
For sites with lots of access points, it just doesn’t get easier than this – and the performance is excellent.
One thing I wanted to do with my (so far) two sites running this combination of equipment (UDM-Pro, UniFI switches and UniFI wireless Access Points) is to have a solid and seamless 4G 4G/LTE backup (Failover) path configured in and operating, for those times when the primary network connection is down.
Over time, I have cranked through quite a list of brands of both ethernet-to-4G gadgets, and (for a regional site I run), I had also cranked through lots of 4G diversity antennas, trying to find a good one.
In the hope of saving others the same expenditure of time, money, and experimentation, I am documenting the combination that is working (really well!) for me.
The barriers to a good experience in this regard are twofold. When it comes to a 4G-Ethernet ‘modem’, you need one that is fast, reliable, supports external diversity antennas, and (critically) supports ‘bridging’ of the 4G connection through to the ethernet port.
I’ve gone through a lot of (in hindsight) rubbish antennas before I found a good one, and I’ve also gone through a number of 4G/Ethernet routers that are either a bit rubbish and/or that insist on inserting their own layer 3 routing table into the data path, adding other /24 network range, more complexity, and becoming a barrier to direct end-to-end-access from the UDM-Pro to the 4G/LTE network provider.
The Parts List
Here are the devices that have worked (really well!) for me… after a trying a lot that did not work well or (in most cases) just did not work at all!
This model is available at Officeworks for A$249 (though I found you ‘had to ask’ – it was behind the front counter, not on the in-store shelving – perhaps because it is a relatively expensive and yet relatively small, hence steal-able box).
The unit has exactly what you need and nothing you don’t. There’s a LAN ethernet port (and a WAN one we don’t need to use for this application), and there is no WiFi (not needed, and just a distraction in practice to have it in there and to have to turn it off).
This unit takes a standard 4G/LTE SIM directly. This goes into little socket arrangement in the base of the unit is a touch non-obvious in terms of how to load and lock-in the SIM. That said, there is a little cardboard guide sheet stuck in the SIM slot to help you to work it out. You open the sliding cover, lay the SIM down on the pins in the box, close the cover and slide it up to lock it.
How to Insert a SIM into the LB 2120
I configured it at first with my Mac, using a USB-Ethernet dongle cabled directly to the unit with a (supplied) patch lead.
In terms of configuration: With a Telstra SIM installed, it was 100% instant plug-and-play, coming up initially on 192.168.5.1 and logged in using the password printed on the back of the box.
I did a firmware update (on general principles) – downloading via the LTE network to do it.
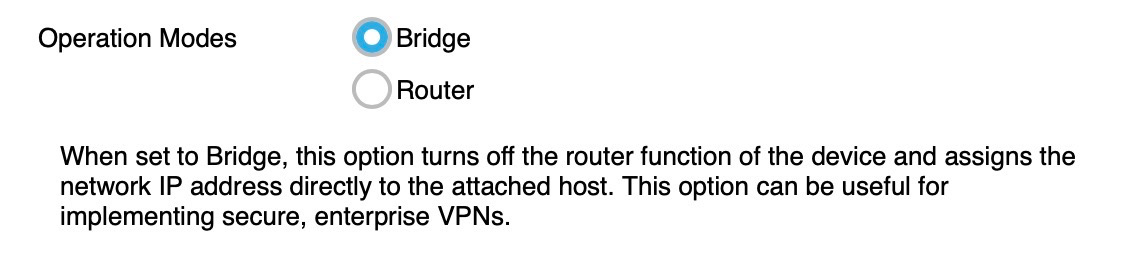
Then I simply switched the unit from router mode to ‘bridge’ mode. This is the key to a very simple life!
After rebooting into Bridge mode, the unit came up on my Mac with the Telstra 4G IP address attached directly to my Mac, fully automatically – exactly what I wanted to see. Zero configuration, and 192.168.x.x network is gone (so it is not, in any sense, ‘in the way’).
Ubiquiti SFP Ethernet Transceiver Module (for the WAN2 port)
When connecting the UDM-Pro to an Internet link, the primary port (designated “WAN(1)” must to be physical port #9. It cannot be any other port on the device (at least, not without behind-the-scenes internal configuration hackery I didn’t want or need to undertake).
Port 9 is a Gig-E port, so that is easily used to connect to (in my case) an Aussie Broadband NBN based Internet service.
In one site, I’m using an Aussie Broadband HFC connection which is direct plug-and-play – literally plug in a patch lead between port 9 on the UDM-Pro and the back of the Arris HFC modem supplied by NBNCo, and the Internet link ‘just works’… zero setup, zero complication. Just instant Internet. Win!
The WAN2 port (failover) port on the UDM-Pro is also a locked-in thing – it has to be Port 10.
As it happens, Port 10 is an SFP socket, not a Gig-E port.
What you need to buy to deal with that is a “Ubiquiti RJ45 – SFP Transceiver Module , SFP to RJ45 1G”
This module, available for $27 from Wireless4Now, plugs into the SFP socket on the UDM-Pro and turns that SFP socket into a standard RJ45 Gig-E port.
High Performance Outdoor 4G / LTE MIMO Antenna Set (optional)
In one site, in a city location, no external 4G antenna was needed with the LB2120 for entirely acceptable performance (30 megabits per second plus – entirely good enough for a failover link!)
In another (regional) site I’ve deployed this equipment into, however, the 4G tower site is several kilometres away (and the networking gear is in an outdoor metal cabinet). There is good line of sight, but at this sort of distance a simple omni-directional antenna doesn’t cut the mustard to get decent performance – its time to bring out the big guns.
After many false starts, I have found a specific antenna and cable combination that rocks. It is not cheap, but… boy does it work. It took my 4G site performance from 1 bar to 5 bars. It took the real world performance up from around 8-10 megabits per second into the 60-70 Megabit per second range (!).
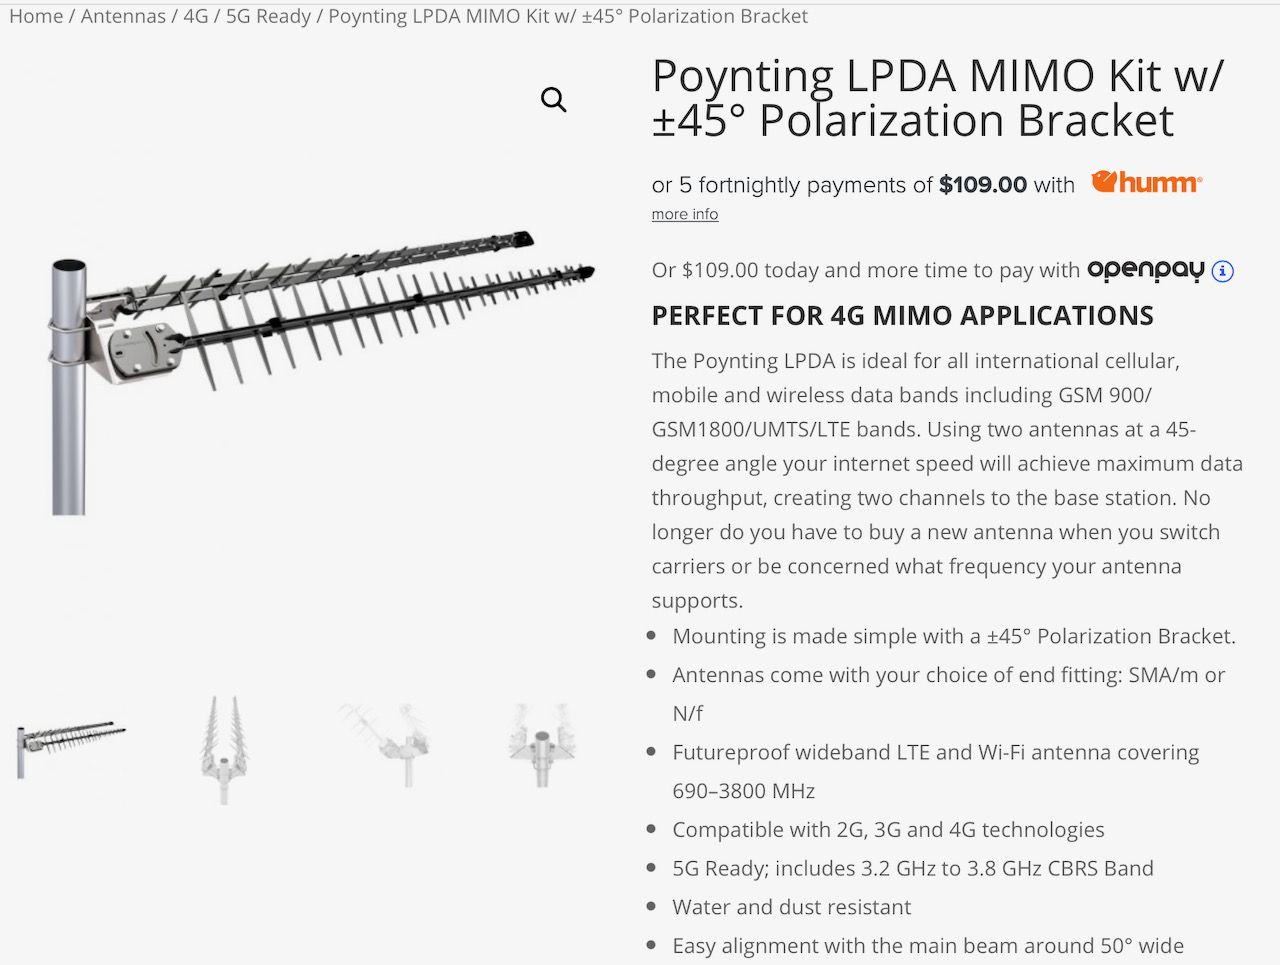
4G MIMO Antenna
4G MIMO Antenna
The antenna kit that did the trick for me is a properly aligned (2 x 45 degree offset) pair of serious Yagi antennas, a suitable mount to achieve that alignment, a backhaul cable, and a 2 x TS9 adaptor tail set to suit the NetGear LB 2120’s on-board TS-9 sockets.
This setup is not cheap – running to a bit more than $600, from RFShop in Adelaide.
It is, however, absolutely worth it if you want to maximise your regional link performance, and the outcome, for me, was a dramatic improvement. This was achieved after multiple attempts with less ‘serious’ antenna sets (that either did nothing for me, or in some cases actually made the performance substantially worse)
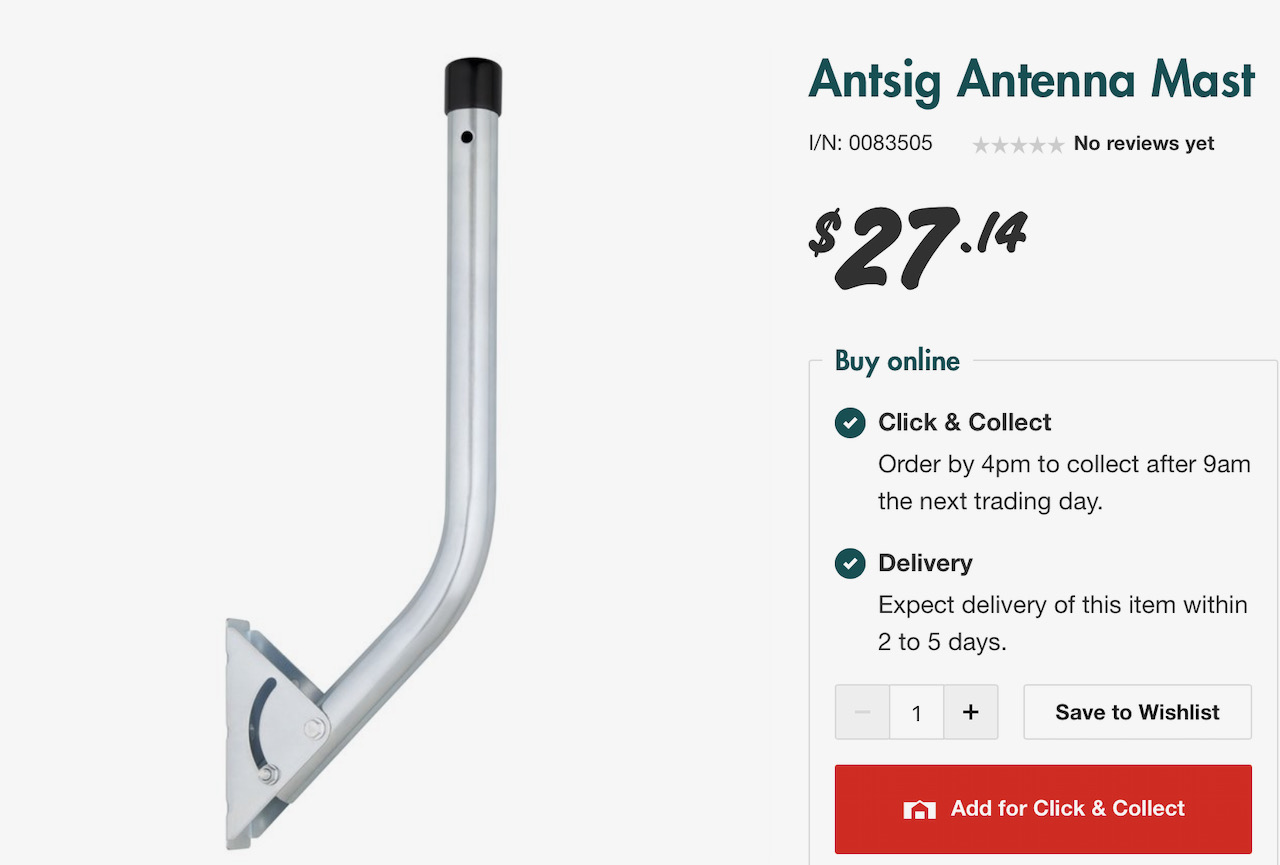
The one other item that was helpful in mounting that Yagi combination (which is quite heavy) was a short ‘TV’ antenna mounting bracket, that turned out to be perfect for the job, for another A$27 from Bunnings Aerospace 🙂
Configuration
Configuration of the failover path was trivial – due to using equipment that ‘just works’ 🙂
Indeed, it was totally plug-and-play. I just inserted the SFP module, plugged the Netgear device in (after first testing on my Mac as noted above), and that was it.
On the UniFI web interface, I selected the UDM-Pro and checked the characteristics for WAN2… bingo, already up and running!
Testing?
That is as simple as unplugging the primary (NBN) cable, observing that the Internet keeps right on going, and doing some speed tests to compare-and-contrast. When done, plug the NBN cable back in.


You must be logged in to post a comment.