Ken Thompson has an automobile which he helped design. Unlike most automobiles, it has neither speedometer, nor gas gauge, nor any of the numerous idiot lights which plague the modern driver. Rather, if the driver makes any mistake, a giant “?” lights up in the center of the dashboard. “The experienced driver”, he says, “will usually know what’s wrong.”
(Source: BSD Unix Fortune Program)
I recently managed to install a current Windows 10 distribution onto an older iMac that I had in storage. I wanted to set up this machine to run some specific Windows software for which it was well suited, and that let me make good use of an otherwise idle machine.
The iMac has a then-fastest-around 2.9Ghz CPU and features the (then) latest and greatest storage innovation, the ‘Fusion Drive’. This is a small SSD blended with a 1Tb Hard Drive. The Fusion Drive was designed to leverage fast-but-expensive SSD’s with slow-but-cheap hard drives, before SSD’s got so cheap that the hard drive became almost irrelevant.
My intention was install Windows 10 using Bootcamp, with an arbitrary 50/50 split of the 1.1Tb Fusion Drive.
At the start of the fateful weekend concerned, I recall thinking ‘how hard can this be?’ because I’d installed Windows using Bootcamp on my current-generation MacBook Pro (with a big SSD) with zero issues at all.
Turns out the answer is: ‘Very Hard’.
I had to get past multiple ‘I should give up because there is no apparent way around this, and the error message gives me no help at all’ situations, spread across what became an entire weekend of trial-and-effort and repeated fruitless attempts at things that took ages, punctuated with just enough ‘ah hah’ moments and clues found via Google to keep me doing it…!
I didn’t find the entire list of challenges I faced in any single web site, so I have decided to write my discoveries down here, in an ‘integrated’ manner. Each of these issues represents some hours of repeated head-banging attempts to get past it that I hope to save you, dear reader, from repeating.
I am assuming in the below that you know how to do a Windows installation using Bootcamp (or are prepared to work that out elsewhere). This isn’t a guide to doing that – its a guide to why the process failed – and failed, and failed, and failed – for me.
Each item below starts with a headline that frames the fix – so if you mostly just want to get it done – just dance across those headlines for a fast path to a working result.
You really need to be running Mojave (Mac OS X 10.14)
I fired up Bootcamp under the OS on the machine at the time – Mac OX 10.13 – and it said it could install windows 7 or later. Well, I wanted to install the latest release of Windows 10, and that’s ‘later’, right?
Wrong.
On this model of Mac you need to use an appropriately large (16GB or more) USB stick. Bootcamp writes the Windows 10 install ISO you’ve downloaded by now (you have, right?) onto that USB stick and turns that into a bootable Windows install drive (including throwing the ‘Bootcamp’ driver set onto it, to be installed into the Windows image once the base install is done).
Well, I plugged in a 16Gb USB stick (actually, I tried several sticks ranging from 8Gb to 32Gb, fruitlessly). In each case, after scratching around for ages, Bootcamp failed with an error message say that my USB stick wasn’t large enough.
Some Google searching turned up the key information here – that Windows 10’s recent ISO’s are large enough that they cross an internal 4GB size boundary that in turn leads to Bootcamp not being able to cope with it properly.
The answer looked to be easy – upgrade to Mojave.
Ok, annoying but straightforward. Cue the download and install process, and come back in several hours…
You also need to update Mojave to the very latest version
Turns out that the build of Mojave one downloads from the App Store isn’t the very latest version (Why isn’t the very latest version? Beats me!).
Bootcamp on the base release of Mojave says it can install Windows 10 or later (not ‘Windows 7 or later’). Yay – that suggests the bug has been sorted out – after all, it mentions Windows 10!
Sorry, but no. Same failure mode, after the same long delay to find out. Argh!
More Googling – turns out the bug didn’t get triggered until some very recent Windows 10 builds, and the base Mojave build still had that (latent) bug when it was released.
Next step is, thus, a Mac OS update pass to move up to the very latest Mojave build, including a version of Bootcamp with the issue resolved in it. This is in fact documented on the Apple support site (if you own 20:20 hindsight).
You may need to back up, wipe and restore your entire Mac OS Drive before Bootcamp’s Partitioning phase will succeed
This one was painful.
After Bootcamp managed to set up my USB stick properly, and managed to download and copy on the Bootcamp windows drivers in as well, it then failed to partition the drive successfully (the last step before it triggers the Windows installation to commence).
As usual, the error message was useless:
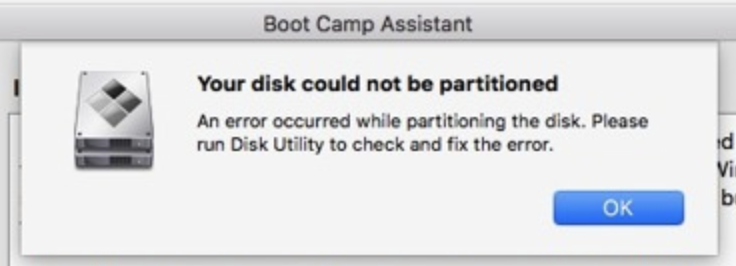
Your disk could not be partitioned ; An error occurred while partitioning the disk. Please run Disk Utility to check and fix the error.
The problem here is that I did run Disk Utility to check and fix the error, and no error was fixed!
The Disk First Aid run came up clean – said my disk was fine.
I tried booting from “Recovery Mode” and running Disk First Aid again – nope, still no error found or fixed.
Time to dive deeper – open up the display of detailed information (the little triangle that can be used to pop a window of debug text) during the underlying fsck…
…One tiny clue turns up – a succession of warnings in the midst of the checking process, a warning (not a failure) involving something about ‘overflows’. Turns out that Disk First Aid (‘fsck’, really), within Disk Utility doesn’t fix these issues – it just declares the disk to be ok and finishes happily despite them.
Disk Utility can even partition the drive just fine – but the Partition function in Bootcamp itself … fails.
The fix turns out to be annoyingly radical: Do a full system backup, and then do a full system restore.
So – break out a spare USB hard drive to direct-connect (less angst and potentially higher I/O rate than doing it over the network). Use Time Machine to back up the whole machine to that local storage, then boot in recovery mode and restore the system from that drive again.
This takes… along time. All day and half the night.
However – it helped! When I tried yet once more, after this radical step… now the Bootcamp partition step works – hazzah!
And then Windows 10 starts to install itself at last – hazzah!
In the windows installer, you may need to format the partition designated for Windows
Once windows starts to install process, it reaches a point where it displays all drive partitions and asks you to just pick the one to install Windows onto.
Merely selecting the right partition (the one helpfully labelled BOOTCAMP) doesn’t work. It fails, saying the partition is in the wrong format.
It seems that some inexplicable reason Bootcamp has left the intended Windows partition in the wrong state as far as the Windows installer is concerned.
The fix is to bravely select the partition concerned (again: its helpfully labelled BOOTCAMP)… and hit the ‘Format’ button to reformat it. Then you can re-select it – and the installation now starts to work – yay!
Use a directly attached USB keyboard when the wireless Apple Keyboard stops working
This one is self-explanatory. My Apple wireless keyboard didn’t work in Windows.
I thought I’d just need to load the Bootcamp drivers to fix that but – not so fast! (see the next issue, below).
Meantime I just switched to a wired keyboard – ironically the one I found in my storage room was a genuine Microsoft branded one with lots of useful extra function keys on it.
I’ve been perfectly happy to just stay with that – especially noting the next issue.
Remove/Rename a magic driver file to avoid Bootcamp support causing a Windows “WDF Violation” Blue-Screen-Of-Death a minute or so after Windows boots
Well, with Windows ‘up’, I installed the Bootcamp mac hardware support drivers. This is important for all sorts of reasons (including WiFi not working until you do).
I did that by selecting the (still mounted/attached) USB installer stick and running ‘Setup’.
The installation of drivers worked fine.
What didn’t come out fine was the unintended consequence.
Once the Bootcamp hardware support was installed, Windows started crashing a minute or so after each boot up, with a “WDF Violation”.
You can log in and start working – just – and then ‘bang!’ – sad/dead windows:

After everything else (and one and a half days of this stuff) – this was really frustrating.
Cue yet more googling – and at least this one seemed to be an ‘understood’ issue.
It appears to the the case that the wrong version of a crucial driver file (keyboard support related, by the looks of it) is loaded in by Bootcamp, but when installing onto this particular generation of iMacs.
Yay.
The fix – after I found it – involves booting Windows in diagnostic mode and disabling that driver file.
Even getting into that diagnostic mode is a challenge… it turns out that you don’t reboot holding down the shift key for ‘safe mode’ in Windows any more – that would too easy…
…Instead, now you boot up and then select restart… and while doing that restart, you hold down the shift key. You then wind up with the opportunity, during the reboot, to access diagnostic functions.
Sure, that’s obvious… not.
Anyway – once booted in diagnostic mode, select to bring up a ‘DOS’ command window.
Now select drive C: and then locate and rename (or delete) the errant driver file concerned (C:\Windows\System32\Drivers\MACHALDRIVER.SYS) as per this screen shot:
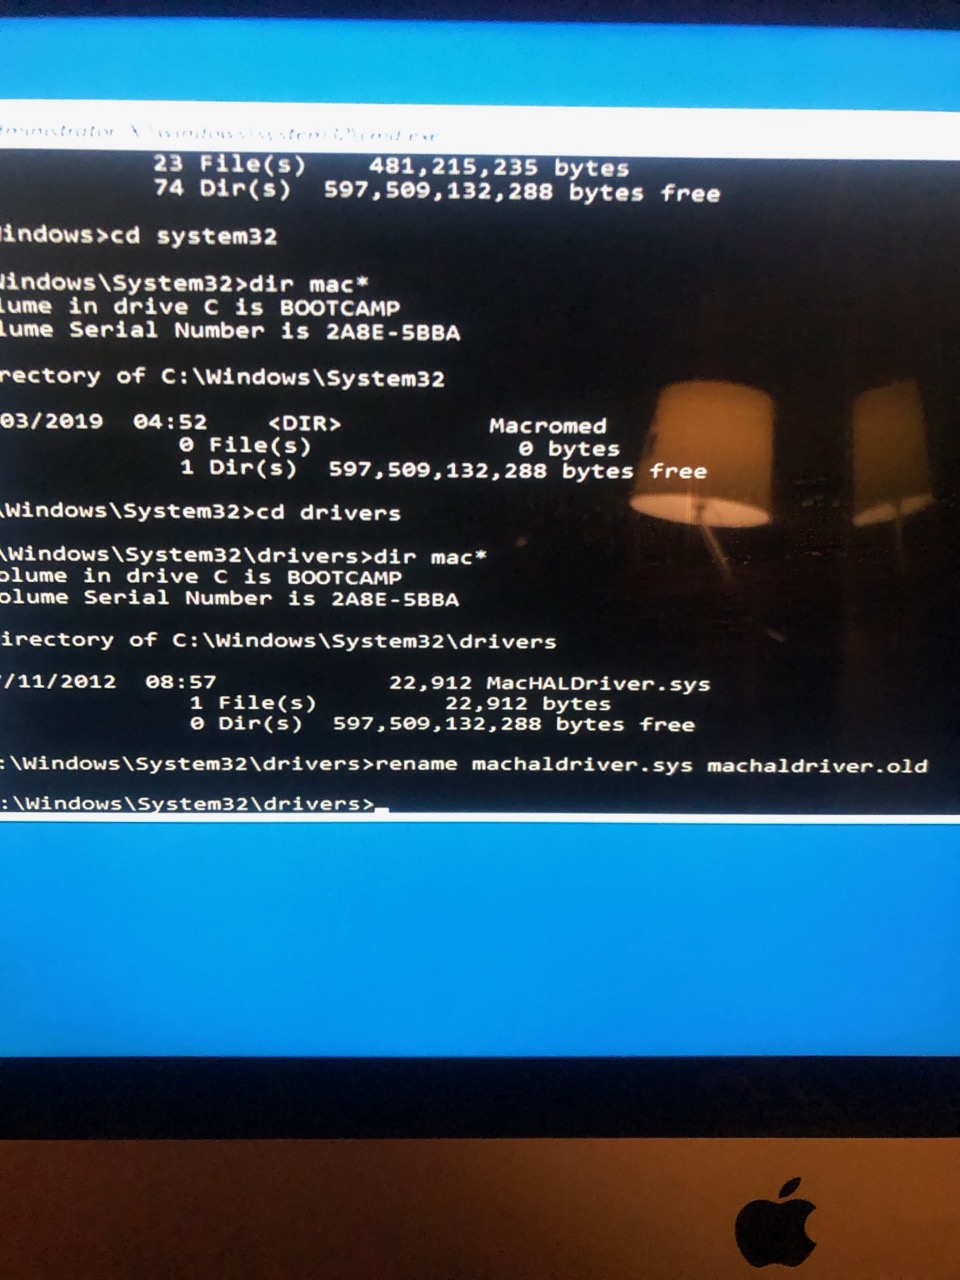
One trap to watch out for: Make sure you’ve changed to drive C:, and that you’re not still on drive ‘X:’ looking for that file.
That drive – which you start out on when bringing up the command window – contains a whole separate copy of Windows…without the bootcamp files on it. So you think you’re searching in the right filesystem – after all, Windows is on it… but you aren’t.
I guess that’s a consequence of using the Diagnostic mode, but it fooled me for a while, as I was trying to find the errant driver file there (on drive ‘X:’) at first…and failing to do so.
Now reboot and – yay – no more WDF blue-screen-of-death failures.
… but also, no bluetooth keyboard support.
No problem to me – I really prefer the direct-attach larger keyboard I found with all the Microsoft specific buttons on it anyway, for this task.
Contrary to warnings on the web sites that had helpfully pointed out the incorrect/broken MACHALDRIVER.SYS file issue, I have had no practical issues with volume control or similar things as a consequence of disabling that file.
For me, it all seems to work fine without this file in my life at all.
Success!
At this point, I have a working Windows 10 installation on my machine.
I have subsequently installed the software I wanted to run in the first place and its all working just fine.
I do hope someone else finds this useful – and that if you do go down this road, that you have a smoother ride than I did! 🙂


You must be logged in to post a comment.